Best Settings for Easier Headshots in Free Fire
Free Fire is a fast-paced battle royale game that has captured the hearts of millions of players worldwide. Developed by Garena, the game is designed for mobile devices and offers an adrenaline-pumping experience with its unique blend of survival, strategy, and action. Each match lasts approximately 10 minutes, making it an ideal choice for players seeking quick yet intense gaming sessions. Diamonds are the premium currency of the game that enables players to unlock new customization for their characters, vehicles, and guns. This guide showcases how players can get free diamonds through different processes in-game. Check them out below!
What are Headshots?
Headshots are the most effective way to eliminate opponents quickly in Free Fire. A single well-placed headshot can knock down an enemy, giving you a significant advantage in the game. To master this skill, you need to combine the right settings, techniques, and consistent practice.
The sensitivity settings in Free Fire directly determine how quickly and accurately you can aim and change your shots. Using the correct Free Fire headshot option might boost your chances of capturing those important headshots without relying on hacks or additional technologies. Fine-tuning these settings improves your character’s movement and allows you to better track foes, especially when shooting for their heads.
Best Sensitivity Settings for Headshots
Sensitivity settings play a crucial role in improving your aim, especially for headshots. Adjusting these settings ensures that your crosshair moves smoothly and precisely.
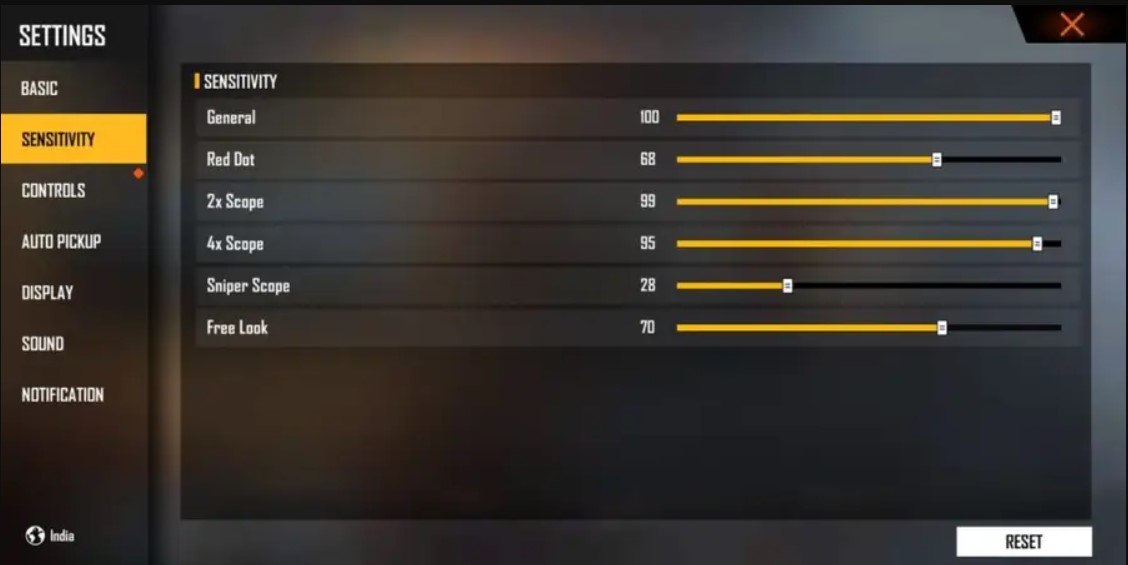
General: 90-100
High sensitivity in General allows quicker crosshair adjustments, which is essential for tracking and aiming at the enemy’s head.
Red Dot: 85-95
This setting is critical for short- and mid-range combat. Higher sensitivity helps you aim accurately at the head while using the Red Dot sight.
2x Scope: 75-85
For mid-range engagements, a slightly lower sensitivity ensures better control when aiming for headshots.
4x Scope: 65-75
A balanced sensitivity for long-range headshots. Too high a sensitivity might make it difficult to control the scope, while too low could hinder quick adjustments.
AWM Scope (Sniper): 50-60
Lower sensitivity ensures precise aim for sniping, making it easier to land headshots on distant targets.
Free Look: 50-60
This setting is less relevant for headshots but helps in scanning the area effectively.
Adjusting Control Settings
Your control settings are also equally important as your sensitivity settings since you need to be comfortable with the mechanics in order to execute those pesky headshots. Keep in mind, controls can be subjective in nature, as some players might prefer quick fire while others may not. We are presenting a generic layout of what your controls can look like for optimal scenarios:
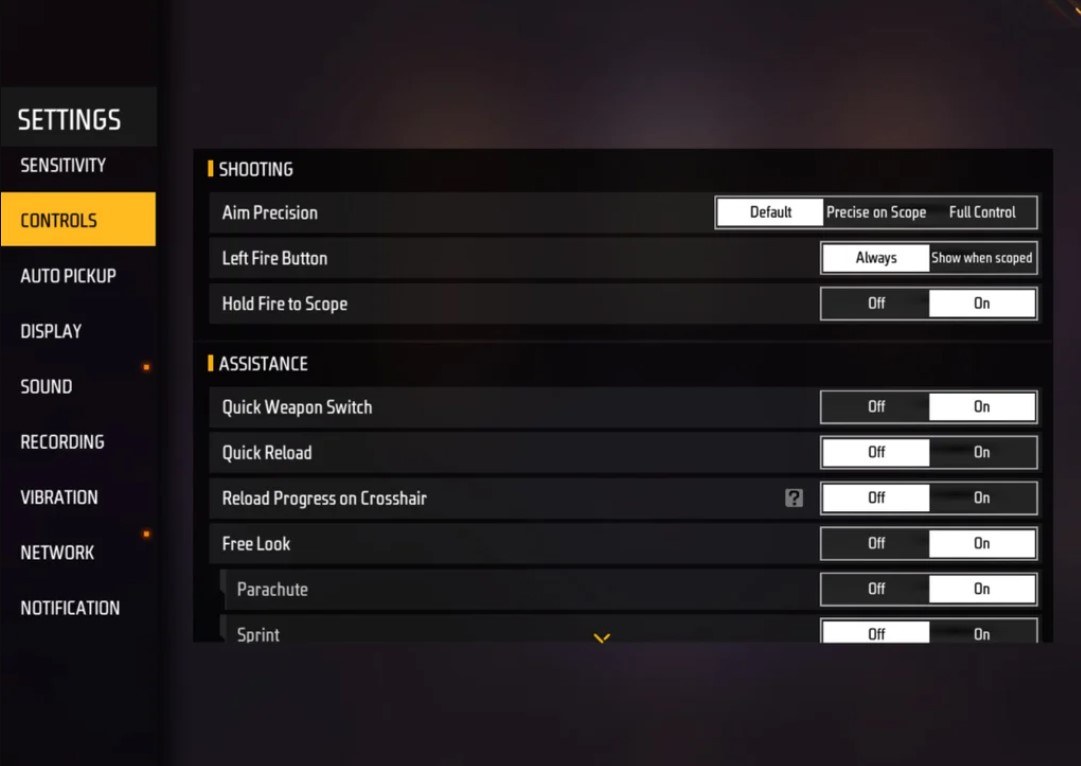
- Aim Precision: Set to default
- Left Fire Button: Always
- Reload Progress on Crosshair: Off
- Hold Fire to Scope: On
- Grenade Slot: Double Slot
- Vehicle Controls: Two-handed
- Auto-parachute: On
- Quick Weapon Switch: On
- Quick Reload: Off
- Run Mode: Classic
- Free Look: On
Optimize your HUD Layout
Your control layout, also known as the HUD, is another critical factor. A personalized setup that suits your playstyle can improve your performance significantly.
Fire Button Placement: Place the fire button where your thumb can easily access it without straining. Most pro players use a three-finger or four-finger claw setup for better control.
Drag Shooting: Enable the “drag shoot” technique by keeping your fire button size between 50-70%. A larger button helps with precise swiping for headshots.
Quick Weapon Switch: Place the weapon switch button near your thumb for faster access, ensuring you’re always ready to aim for the head.
Crouch and Jump Buttons: Position these buttons near your movement controls for executing the crouch + shoot and jump + shoot techniques effectively.
Scope Button: Keep the scope button close to your index finger for quick aiming and better headshot alignment.
Increase your Headshot Accuracy Using BlueStacks Tools
While the tiny mobile screen of mobile devices is great for navigating through the terrain, it fails at delivering the efficiency of a larger screen of your PC or Laptop when it comes to taking aim at your targets in search of that prestigious headshot. Enter BlueStacks and its multiple integral features that can significantly enhance your chances of landing headshots with ease, thanks to improved graphical performance and customizable keyboard controls. Check out the top features of BlueStacks that all Free Fire players can utilize to improve their aim:
Keyboard and Mouse Support: BlueStacks allows you to map controls to your keyboard and mouse, offering greater accuracy and ease of aiming compared to touch controls. You can assign specific keys for movement, aiming, and shooting, mimicking a PC gaming setup.
Customizable Key Mapping: The built-in key mapping feature lets you customize controls to suit your preferences. For headshots, you can assign the fire button to the mouse for smoother drag shots and quicker reaction times.
Enhanced Graphics and Performance: With BlueStacks, you can set the graphics to the highest settings without worrying about device overheating or lag. This ensures a smoother gameplay experience, making it easier to focus on precise aiming.
Improved Sensitivity Settings: BlueStacks enables fine-tuned sensitivity adjustments, giving you better control for drag shots and scoped headshots.
Players can enjoy Free Fire even more on a bigger screen of their PC or Laptop, complete with your keyboard and mouse via BlueStacks!

