Exploring Free Fire Maps: Overviews, Strategies, and Tips for 2025

Free Fire’s diverse maps play a huge role in shaping your gameplay. Each one features unique terrains, zones, and hotspots that cater to different playstyles. Whether you prefer intense close-range fights in urban areas or long-range sniping from high ground, understanding the layout of each map is key to gaining an edge in this action game.
In this guide, we’ll explore the six maps currently available in Free Fire—Bermuda, Bermuda 2.0, Kalahari, Purgatory, Alpine, and NeXTerra. We’ll highlight the top zones, uncover hidden gems, and provide tips and tricks to help you excel on every battlefield.
Bermuda
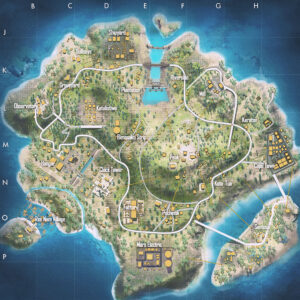
Bermuda is the most balanced and versatile map in Free Fire, offering opportunities for players of all playstyles. The varied terrain ranges from urban areas like Factory and Clock Tower to wide-open fields and rivers near Cape Town. Whether you prefer rushing enemies in hotspots or taking a stealthy approach in quieter areas, Bermuda offers playstyle alternatives for all the different weapon types.
Tips and Tricks for Bermuda
On Bermuda, controlling high-ground areas like Peak and Clock Tower is essential for long-range sniping. These zones not only offer great visibility but also provide natural defenses against players trying to approach. If you prefer a more defensive or slower start, land in low-traffic areas such as Cape Town or Rim Nam Village, where you can quietly loot and prepare for the mid-game.
When crossing open areas near Bimasakti Strip or Plantation, always ensure you have cover nearby. Gloo Walls are especially important in these regions, as they can shield you from snipers perched in high-ground locations. In close-range hotspots like Factory, stick to tight spaces and corners to maximize your chances of ambushing opponents. Timing your rotations is also crucial—early movement toward the next safe zone can save you from getting caught in the open.
Bermuda 2.0
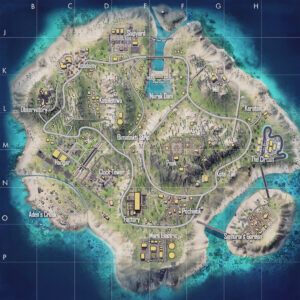
Bermuda 2.0 modernizes the classic map by introducing fresh layouts and updated zones, which add depth to its gameplay. The new areas bring a mix of verticality, dense structures, and open spaces, challenging players to adapt to unfamiliar terrain. Aggressive players can dominate Academy, while tactical players can take advantage of Nurek Dam’s elevated vantage points.
Tips and Tricks for Bermuda 2.0
Academy is the most contested area on Bermuda 2.0, offering high-tier loot and ample opportunities for mid-range combat. Securing this area early is key, as controlling the central buildings allows you to monitor enemy rotations and plan your next move. If you prefer a more methodical playstyle, Samurai Garden’s structures provide excellent cover for ambushes. Use the pagodas and walls to trap unsuspecting enemies while keeping multiple escape routes in mind.
Nurek Dam is another standout location, ideal for players who value long-range sniping. The high ground here allows you to survey nearby zones and pick off rotating opponents, but be mindful of enemy snipers with the same idea. Aden’s Creek, while quieter, is perfect for gathering loot and preparing for fights in safer conditions. To succeed on Bermuda 2.0, take advantage of the modernized cover options and adapt quickly to the map’s updated design.
Kalahari
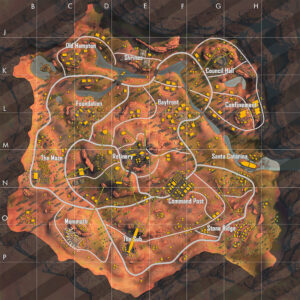
Kalahari’s desert terrain and rugged cliffs make it a haven for long-range specialists. The open landscapes favor players who can effectively use sniper or marksman rifles, while its scattered structures and elevated platforms reward those with strong positioning skills. However, the lack of natural cover means that rotations must be planned carefully to avoid getting caught in the open.
Tips and Tricks for Kalahari
Refinery is Kalahari’s most strategic location. With its elevated platforms and central positioning, players who dominate this area early can control a significant portion of the map. Snipers will thrive here, as they can pick off enemies approaching from lower ground. However, you must remain vigilant, as this hotspot is highly contested and offers little room for error.
If you’re traversing Kalahari’s open deserts, use rocks, structures, and even Gloo Walls as temporary cover. A zigzag movement pattern is essential to dodge sniper fire, especially in areas like the Command Post outskirts. Bayfront is another critical zone, balancing loot opportunities with moderate traffic. Stick to its inner structures for close-quarters fights while watching for ambushes. For a quieter start, Quarry and Old Hampton provide decent loot with fewer risks, allowing you to prepare for tougher engagements later.
Purgatory
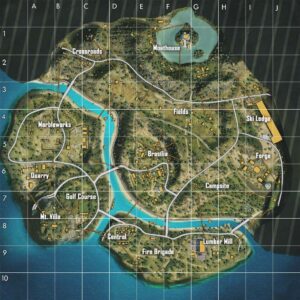
Purgatory’s mix of bridges, waterways, and open fields demands a high level of adaptability. It’s a map where rotations are vital, as getting caught near a bridge or in open terrain can be disastrous. Aggressive players will find plenty of action in Brasilia, while tactical players can excel by controlling chokepoints or using quieter zones like Forge for preparation.
Tips and Tricks for Purgatory
In Purgatory, controlling Brasilia is often the key to success. This central hotspot offers abundant loot and constant action, but to survive, you’ll need to secure a building with multiple exits. This ensures you won’t get trapped during a firefight. For players who prefer long-range engagements, the open fields near Marbleworks and Fields are ideal. Use sniper rifles or marksman rifles to control these areas, but always have an escape plan in case the zone closes elsewhere.
The map’s many bridges are chokepoints that can be used to your advantage. If you’re defending a bridge, plant landmines or use grenades to block advancing enemies. If you’re the one crossing, stick to cover and rotate early to avoid being caught in a crossfire. For a safer start, Forge and Campsite provide reliable loot while keeping you away from early-game chaos. Smart rotations and timely engagements are critical to thriving on Purgatory.
Alpine
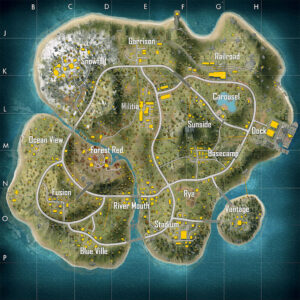
Alpine is a visually stunning map with snowy landscapes and urban hotspots. It supports a variety of playstyles, from long-range sniping in elevated zones like Vantage to aggressive close-quarters fights in areas like Blue Ville. Mastering this map requires strong awareness of both terrain advantages and vulnerabilities.
Tips and Tricks for Alpine
Vantage is the go-to spot for snipers, offering exceptional high-ground opportunities and great loot. If you’re aiming to dominate this area, secure a sniper rifle early and use the high ground to pick off enemies rotating from below. Dock and River Mouth are ideal for defensive players who prefer to avoid early confrontations. These zones provide decent loot with minimal competition, allowing you to plan your next move carefully.
In Alpine’s urban hotspots like Blue Ville and Militia, SMGs and shotguns are your best allies. The tight corridors and dense buildings make close-range weapons invaluable for ambushes. However, always keep an eye on the shrinking safe zone, as Alpine’s diverse terrain can make late-game rotations challenging. Use natural cover like snowdrifts or Gloo Walls to protect yourself in open areas and maintain awareness of enemy positions.
NeXTerra
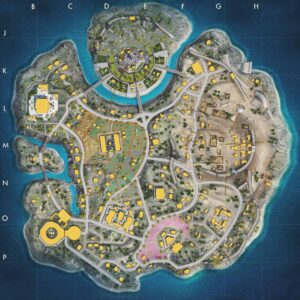
NeXTerra’s futuristic design introduces unique mechanics like anti-gravity zones, pushing players to adopt innovative strategies. The map encourages aggressive playstyles in hotspots like Deca Square but also rewards careful planning in quieter zones like Mud Site. Adapting to these new features quickly can give you a huge advantage.
Tips and Tricks for NeXTerra
Anti-gravity zones are the most distinctive feature of NeXTerra. Use them to escape fights or rotate quickly, but be cautious—being airborne makes you an easy target. Deca Square is the map’s most intense hotspot, offering high-tier loot but requiring quick reflexes and aggressive play to survive. Secure loot quickly and move to the outskirts to pick off enemies who linger too long.
Graviton offers a mix of high loot and ambush opportunities, making it an excellent zone for tactical players. Learn the layout of its futuristic structures to outmaneuver opponents. If you prefer a quieter approach, Mud Site is a great choice for early-game looting with minimal risk. To excel on NeXTerra, focus on mastering the mechanics of its unique terrain and balancing aggression with tactical retreats.
Each Free Fire map offers a unique battlefield that caters to a wide range of playstyles. Whether you’re mastering sniper positions in Kalahari, adapting to futuristic mechanics in NeXTerra, or controlling hotspots in Bermuda, understanding the layout and using effective strategies will give you the edge you need.
For an even better gaming experience, play Free Fire on PC with BlueStacks. With customizable controls, high FPS, and precise aiming, BlueStacks ensures you’ll dominate every match. See you on the battlefield!


