Tales of Luminaria on PC - BlueStacks Guide for Optimizing Your Gameplay

The latest entry in the “Tales” series was launched earlier this month in the form of Tales of Luminaria, Bandai Namco’s most recent installment in the franchise. Curiously enough, however, for a game series that has been predominantly present on console, and later on PC, this one is a mobile game, playable only on phones. In stark contrast to the others, would-be gamers have to, in the first place, have a phone good enough to run it, and secondly, download and install it on their mobile devices, after which they would have to struggle with gaming on a small screen, with clunky touchscreen controls, battery drainage and overheating, and other issues of playing on mobile.
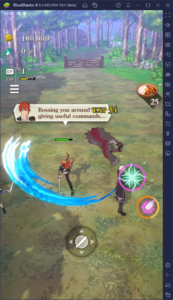
Luckily, fans of the series can enjoy Tales of Luminaria on PC, by playing it on BlueStacks, our Android app player. In this sense, everyone can partake of the latest entry in the franchise, without having to break the bank on an expensive phone, particularly since BlueStacks has very accessible spec requirements, and can run adequately on a wide range of computers, even when you crank the in-game graphics and frame rate to the max. And of course, since you’re not playing on a mobile device, you won’t have to deal with the usual issues mentioned above.
However, gaming on a larger PC monitor is and with great visuals and performance is far from being the only thing BlueStacks offers when playing Tales of Luminaria on PC. And in this guide, we’re going to talk about a few of the tools that players can access when gaming on our Android emulator, as well as how to configure them to get the best experience with this game.
Dominating in Combat With Keyboard Controls
Tales of Luminaria were specifically designed to be played on mobiles using only one hand. This is facilitated by the unifying action button located in the bottom center of the screen, with which you can perform nearly every action in combat. With this button, you can move your character, dodge attacks, swing your weapons, and execute charged attacks, among others. And while you still have a few extra buttons on the screen, for things like unleashing special “Artes” and consuming items to restore HP, to name a few, the vast majority of the combat will revolve around that center button.
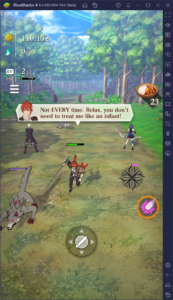
Understandably, since so many actions are bound to a single button, it’s not uncommon for players to get input errors in this game, dodging when they meant to attack, or doing a charged attack when they meant to do a few quick swings, and so on. In fact, this was one of the main complaints about Tales of Luminaria after its release and is something that the developers have acknowledged and are working to improve. Luckily, if you play on PC with BlueStacks, you can use the Keymapping Tool to create a better control scheme for Tales of Luminaria, one that uses your keyboard and mouse.
The Keymapping Tool is a feature through which players can create customizable and versatile control schemes for their favorite mobile games. To access this tool, you simply need to press Ctrl + Shift + A while in-game. This new screen that appears is the advanced editor, in which you can view your current bindings, modify them, or add new ones.
In Tales of Luminaria, you will first need to create your own control scheme before being able to play with the keyboard and mouse. Luckily, all you need to do here is drag functions from the panel on the right and drop them on the areas of the screen where they are needed. For reference, check out our setup below so you can get an idea of what you need to do.
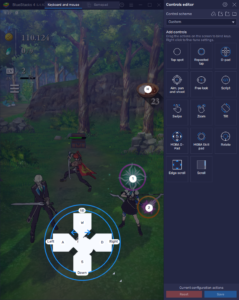
To elaborate a bit on our setup, here’s what we did:
- We set a D-pad function over the center button to control our movements with the WASD keys.
- We also set a Swipe function in the same area so that we could dodge by using the arrow keys.
- Finally, we set a Tap function in the center button and bound it to the Spacebar so that we can attack using this button.
- We ended by placing a few extra Tap functions on the Artes and food buttons so that we could control these features with our keyboard as well.
With this basic setup, you can control basically every aspect of the combat in Tales of Luminaria, just with your keyboard. With it, you can attack, dodge, use skills, and heal up without any issues. Keep in mind, however, that as you progress and unlock other features, you might want to add more buttons to your setup, either to simplify menu navigation out of combat, or for when you unlock additional aspects within the combat stages.
Achieving the Best Graphics and Performance
For a mobile game, Tales of Luminaria looks actually pretty good, which can be both good and bad. It’s good because we all like our games to look great. However, it’s also bad because, in order to run it with adequate performance on your phone, you’d need a beefy device, which can set you back a few hundred bucks. However, as we mentioned earlier, BlueStacks is faster and stronger than even the most expensive phones, which means that you can get the best performance and graphics, as long as your PC fulfills the recommended requirements for our emulator.

However, before you can achieve the best gameplay experience, you’ll need to tweak a few settings both in BlueStacks as well as in-game. Here’s a quick rundown of the process.
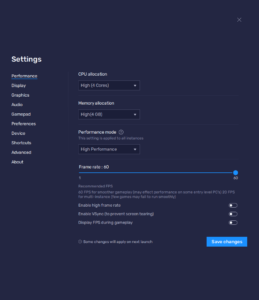
- Head to the BlueStacks settings, and in the Performance section, make sure that the emulator has 4 CPU Cores, 4 GB of RAM, and that the performance mode is set to “High performance”. Lastly, set the FPS slider on the bottom to at least 60 FPS. Finish by clicking on “Save changes”.
- Launch Tales of Luminaria and head to the in-game options. In the Graphics settings, make sure that it’s set to “High”.
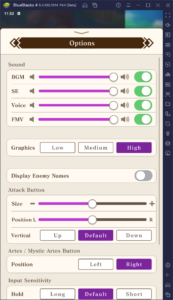
These quick settings will ensure that your game looks and runs optimally, which will in turn help to get the best experience with Tales of Luminaria.


